How to Make a True Mirror at Home: DIY Optics & Digital Builds
Learn how to make true mirror setups at home using 90-degree first-surface glass or zero-seam webcam flips, with costs, seam gaps, and comparison data.
Figuring out how to make true mirror builds at home usually starts after seeing an unfamiliar candid photo, then noticing commercial non-reversing mirrors retail for $150 to $650 (and over $2,000 for wall models). A true mirror removes the horizontal left-right flip of flat bathroom glass so your smile, hair part, eyewear tilt, and minor facial asymmetries match external viewer perception in real time.
DIY builders on r/howto and r/DoByFriday quickly discover why taping two cheap hardware-store mirrors together fails: back-silvered glass leaves a 3 to 6 mm gap and double ghosting straight down your nose. Before buying optical glass or brackets, Open True Mirror Free in your browser to compare your un-mirrored camera feed side-by-side against your familiar mirror image with zero center seam.
Key Takeaways
- Optical true mirrors pair two flat panes vertically at
90.00 degreesso light bounces twice and cancels lateral inversion; even a0.5 degreeerror pinches or splits features at the seam. - Household glass mirrors are second-surface panels (
3 to 6 mmthick) where silver sits behind glass, creating an unavoidable6 to 12 mmvisual gap and ghosted edges at the crease. - Seamless physical builds require first-surface mirrors (
$25 to $65DIY pair for coated glass or rigid acrylic) where the reflective metal sits directly on the front face. - Soaking back-silvered IKEA or craft mirrors in paint stripper almost always hazes or scratches the delicate silver layer, wasting time and glass panels.
- Digital setups using an un-flipped webcam in OBS Studio or browser tools cost
$0, show zero center seam, and stay accurate4 to 6 feet(1.2 to 1.8 m) back.
The Optics and Psychology Behind Non-Reversing Mirrors
Understanding what flips inside everyday glass clarifies why two small geometric adjustments change how your reflection reads immediately.
How Two 90-Degree Reflections Cancel Lateral Inversion
A single plane mirror reverses depth along the front-to-back axis perpendicular to the glass rather than swapping left and right mechanically. Because viewers mentally rotate themselves to face their reflection, that depth inversion creates a chiral left-right swap: your right hand stays on the right edge of the glass, matching the left hand of someone facing you across a table.
Setting two mirrors vertically edge-to-edge at 90.00 degrees inserts a second orthogonal bounce. Light from your right cheek hits the right pane, crosses diagonally onto the left pane, and returns to your eyes. Double reflection restores external orientation: printed words read forward, blinking your right eye matches the viewer's left side of the frame, and crooked glasses or uneven parts appear plainly.
Angular tolerance dictates image quality. As physics explainers show in this r/explainlikeimfive true mirror thread, folding tighter than 89 degrees pinches your nose bridge or doubles nostrils across the midline, whereas opening past 91 degrees drops a vertical slice out of view.
Why Your Un-Reversed Face Feels Unfamiliar
Seeing your un-flipped face for the first time surprises almost everyone. In a classic 1977 Journal of Personality and Social Psychology paper ("Reversed Facial Images and the Mere-Exposure Hypothesis"), researchers Theodore H. Mita, Marshall Dermer, and Jeffrey Knight showed volunteers paired portraits: their familiar mirror view and their un-reversed photo. Participants favored the mirror version they saw every morning, whereas close friends preferred the un-reversed orientation seen daily in person.
Owners sharing notes in this r/indiasocial true mirror thread adapt within days once exposure replaces habit. Subtle 1 to 3 mm left-to-right differences in brow or smile height reflect normal anatomy, detailed in our facial symmetry guide.
Step-by-Step Guide: Building a Physical 90-Degree True Mirror
If you want lag-free optical depth and direct eye contact for speech practice or grooming, assembling a compact tabletop unit takes roughly an hour once proper optical panels arrive.
Step 1: Source First-Surface Mirrors (And Skip Paint Stripping)
Reserve cheap beveled bathroom tiles for a five-minute optical experiment at most. Placing two 3 to 6 mm second-surface mirrors edge-to-edge separates the reflective silver planes behind clear glass, creating distracting ghost edges and a wide gap down your nose bridge.
Order first-surface mirrors (front-surface panels) instead, where vacuum-deposited aluminum and a clear silicon-dioxide protective coat sit on the front glass surface. Two 8x10 or 10x12 inch first-surface glass panes cost $25 to $65 from optical surplus vendors, while front-surface acrylic sheets run $20 to $40 when mounted onto rigid backing so they cannot bow. Budget tinkerers also salvage crisp small glass from broken rear-projection TVs or Polaroid cameras, a trick documented in this r/AnalogCommunity surface mirror discussion.
Skip DIY shortcuts claiming paint stripper uncovers a usable first surface on IKEA mirrors. Optical hobbyists across this r/projectors first-surface mirror thread confirm that solvents eat unevenly into unprotected silvering, leaving milky haze and copper blotches.
Step 2: Jigging a True 90.00-Degree Corner and Eliminating Seam Gaps
With two flat-ground (unbeveled) first-surface edges ready, assemble a rigid frame that stays within +/- 0.2 degrees of square:
- Scribe an exact
90.0-degreeV-channel onto12 mmplywood, MDF, or rigid foam board using a machinist square or drafting triangle instead of trusting wall corners. - Rest both front-coated edges lightly together at the apex so the hairline gap stays under
0.5 mm, avoiding tight clamping pressure that chips thin glass corners. - Add two fine-pitch adjustment screws behind the outer rim of one panel, a calibration step detailed by makers in this r/DoByFriday DIY true mirror thread and this r/howto true mirror build guide. Holding printed words
45 cmin front of the center crease lets you dial one screw a quarter-turn until letters read smoothly across the line. - Protect delicate front coatings: remove dust with compressed air and wipe lightly using clean optical microfiber and distilled cleaner instead of paper towels or ammonia sprays.
Commercial true mirrors ($150 to $650+) bundle factory-ground micro-seams, anodized frames, and moisture seals. A careful tabletop DIY rig gives identical optical reflection physics when kept dry.
Digital True Mirror Alternatives: Webcam, OBS, and Browser Setups
For grooming, glasses fit, and speaking practice, many DIYers prefer a zero-seam digital rig because monitors eliminate center lines and fragile exposed coatings.
Fixing the Webcam Horizontal Flip in OBS Studio
Video chat windows and selfie previews mirror your image horizontally by default so adjusting your hair feels intuitive, even though external viewers receive an un-reversed feed. Building a crisp desktop true mirror takes two minutes in free OBS Studio:
- Add your USB webcam (
1080pat60 fpstracks expression smoothly) as aVideo Capture Devicesource. - Right-click the preview canvas, open
Transform, and toggleFlip Horizontaluntil text held before the camera reads forwards on your monitor. - Rotate a secondary display vertically if you want shoulder-to-crown framing when checking collars or blazer fit.
Managing Camera Focal Length and Lighting
Digital cameras carry one optical catch that glass ignores: close-up perspective warp. Built-in laptop webcams and 24 mm front phone cameras sitting 35 to 50 cm away widen the nose by roughly 10% to 15% while narrowing cheekbones behind it.
Mount your webcam 4 to 6 feet (1.2 to 1.8 m) back with a gentle 50 to 85 mm equivalent crop and neutral 5000K front illumination so shadows stay balanced across both cheeks. Pairing an un-reversed camera preview with landmark measurements inside Facial Brief's 42-Metric Full Report clarifies subtle tilt versus bone structure. Checking un-flipped symmetry also helps verify nose-pad alignment and frame tilt alongside our glasses for face shape guide and daily presentation basics inside our realistic glow-up guide.
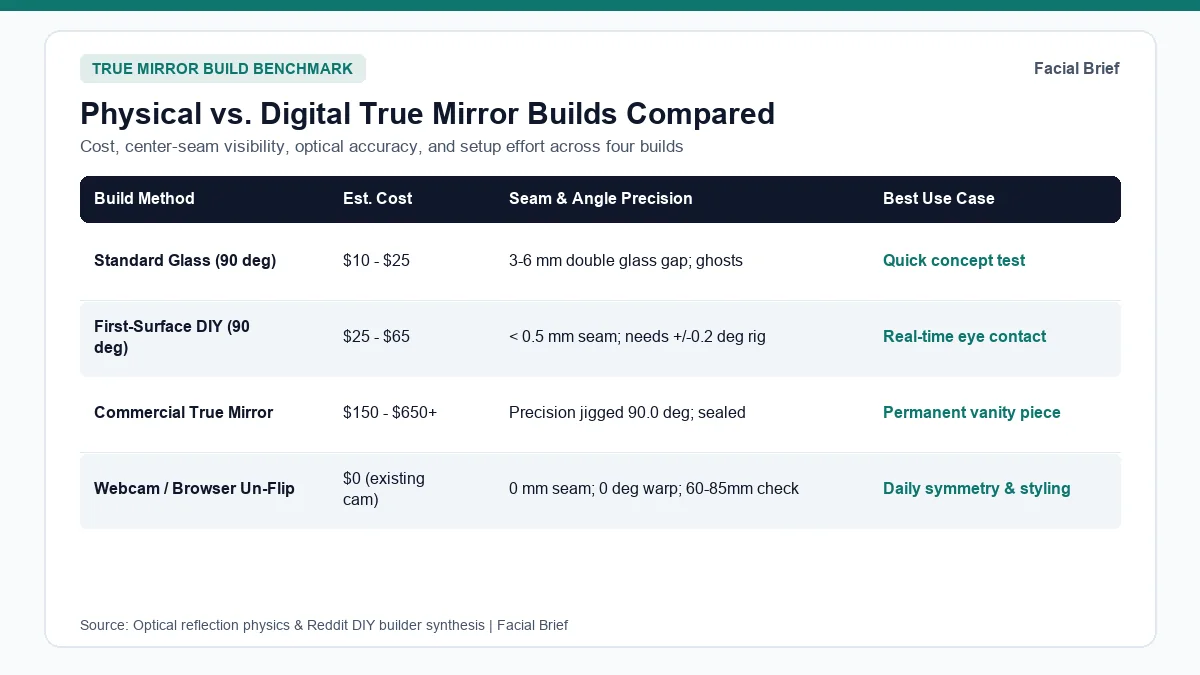
Physical vs. Digital True Mirror Build Comparison
Choosing between optical glass and un-flipped video depends on whether lag-free eye contact or seamless everyday framing matters most.
| Setup Option | Typical Cost | Center Seam & Ghosting | Angle / Distortion Risk | Best For |
|---|---|---|---|---|
Standard Store Glass (90 deg) | $10 to $25 | 3-6 mm gap + double image | High seam distraction | Quick 5-minute optical demo |
First-Surface Acrylic DIY (90 deg) | $20 to $40 | < 0.5 mm hairline; zero ghosting | Plastic flexes without rigid backing | Budget lightweight tabletop build |
First-Surface Optical Glass DIY (90 deg) | $35 to $65 | < 0.3 mm crisp seam; true color | Needs +/- 0.2 deg calibration screw | Sharpest homemade optical mirror |
| Salvaged Rear-Projection Glass | $0 to $15 | Minimal seam if edges ground | Fragile edges; small panel size | Tinkerers repurposing old hardware |
| Commercial Retail True Mirror | $150 to $650+ | Factory-machined near-invisible line | Sealed against bathroom moisture | Permanent vanity gift or studio rig |
| OBS / Browser Un-Flipped Camera | $0 (existing cam) | 0 mm seamless full-face image | 24 mm close-up lens warp if < 1 m | Daily styling, glasses fit, speech prep |
See how un-flipped landmark metrics, midline tilt, and facial thirds read on a calibrated layout inside our sample biometric report.
Frequently Asked Questions
Why do two regular bathroom mirrors at 90 degrees leave a blurry line down my nose?
Household glass mirrors place their metallic reflective coat behind 3 to 6 mm of transparent glass. When two standard panes meet at 90 degrees, light bounces weakly off the outer glass surface and strongly off the deeper silver backing, creating ghosted double outlines alongside a wide distracting optical gap straight down your nasal midline whenever you try looking directly ahead.
Can I strip the backing off an IKEA mirror to make a first-surface true mirror?
Stripping paint off standard household mirrors almost never yields a clear front reflection. Because rear-silvered coatings are ultra-thin and unprotected against harsh chemical removers or scraping tools, paint strippers routinely leave milky oxidation streaks, copper haze, and visible micro-scratches. Purchasing purpose-coated first-surface glass or rigid acrylic panels ($25 to $65 per pair) saves wasted time and delivers sharp clarity immediately.
Is an un-flipped iPhone front camera or webcam the same as a physical true mirror?
Orientationally, yes: disabling "Mirror Front Camera" or flipping an OBS webcam feed horizontally removes left-right reversal and displays the exact orientation others see in real conversation. However, close 24 mm selfie lenses held at arm's length broaden the center nose slightly compared with physical glass reflection, so position cameras 4 to 6 feet back under balanced daylight for accurate proportions.
How accurate does the 90-degree angle need to be on a DIY true mirror?
Your corner junction needs to stay within roughly +/- 0.2 degrees of 90.00 degrees for crisp single-image focus at 45 to 60 cm viewing distance. Even a 1-degree deviation splits or doubles features along the center crease or drops a dark vertical slice down your nose bridge, which a pair of fine rear thumb-screw adjustments resolves easily in seconds.
Referenced Community Discussions & Sources
- How to Build a True Mirror DIY Discussion (r/howto): Practical community walk-through comparing physical 90-degree first-surface glass setups against un-mirrored camera rigs.
- DIY True Mirror Calibration and Seam Tips (r/DoByFriday): Maker discussion covering micro-adjustment screws, junction tolerances, and keeping seams tight for real-time eye contact.
- Why Strip-Your-Own First-Surface Mirrors Fail (r/projectors): Optical hobbyist warnings detailing why chemical paint stripping corrodes household mirror coatings instead of producing usable front-surface panels.
- Cheap First-Surface Mirror Salvage Sources (r/AnalogCommunity): Hardware tinkerers sharing clean low-cost ways to source real front-surface glass from legacy optics and cameras.
- True Mirror Ownership & Un-Reversed Perception Notes (r/indiasocial): Real user feedback describing initial shock versus rapid adaptation to un-flipped facial proportions.
- Physics of Double-Bounce 90-Degree Mirrors (r/explainlikeimfive): Concise optical explanation of chiral double-reflection and why angle drift breaks center alignment.
- Psychological & Optical References: Mita, T. H., Dermer, M., & Knight, J. (1977), "Reversed Facial Images and the Mere-Exposure Hypothesis," Journal of Personality and Social Psychology; standard planar corner-reflector geometry.
Paired Facial Brief Analyzer
Measure your own proportions on-device
Run private 478-point landmark geometry in your browser with zero server photo upload on free tools.
Continue Reading